Currently, there are no applications available to take a screen capture of your Nexus One. This is a step by step guide to take a screen capture of your Nexus One.
Step 1: Install Java Platform (JDK 6 Update 18)
Step 2: Install the Android SDK Tools, Revision 4
- If you have not already installed the Android SDK follow
- From your home screen (pictured below) press "Launcher" icon to view all applications.
- Start "Settings"
- Select "Applications"
- Select "Development"
- Check "USB debugging" if it's not already checked.
- Now that your Nexus One is ready, plug your phone into the computer via the USB cable.
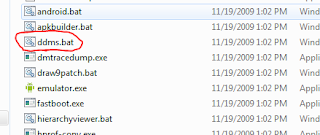
- Go to your Android SDK folder > "Tools". On my system I placed the Android SDK here "C:\Program Files\eclipse\android-sdk-windows" so I will navigate to "C:\Program Files\eclipse\android-sdk-windows\tools"
- Double click on "ddms.bat" to launch the Dalvik Debug Monitor.
NOTE: IF IT FAILS TO LOAD and the window just closes immediately, you might have to update your system Environment path for JAVA.
- If it did not launch go to "Control Panel > System > Advanced system settings"
- Press "Environment Variables..."
- Select "Path"
- Press "Edit..."
- Add the path the path to JAVA (;C:\Program Files\Java\jdk1.6.0_17\bin) to the end of the "variable value"
- Press OK and save your changes.
- Continue by double clicking on "ddms.bat" to launch the Dalvik Debug Monitor in the "tools" directory.
- The application will launch and your phone will be listed.
- Select "Device > Screen capture..."
Now you can copy and paste the screen capture into a photo application or save a copy.


No comments:
Post a Comment